Showing posts with label sterling silver. Show all posts

Joined The Year Of Jewelry Project 2011 - New Beginnings

After watching from the sidelines for the last couple of years, I've decided to actually join in the fun at the Year of Jewelry Project 2011. My goal is to improve greatly my wire wrapping skills once I've finished the year. I just hope I can keep up with a project a week until then :)

The first week's theme is called New Beginnings, and I created this pendant with 2 new beginnings in mind. For one, I've actually used for the first time balled up wire for the pendant frame. Until now I only used it for silver headpins. Click here if you want to learn how to create your headpins using a simple gas stove technique.

Also for the first time I actually designed this pendant from scratch. I did a few designs on paper, then I created something in brass wire, measured it, created it again for about 2 times, and when I was satisfied that it was a workable idea, I've created it in sterling silver. So this is definitely something new for me. It's fun to go through the creative process and come up with something other than simply following some tutorials and apply your own twist to them.


The pendant is using chrysoprase as the focal briolette gem, silver stardust and some tiny green crystals which I'm not quite sure what they are. The are translucent when hold against the light. The entire silver pendant length is about 2 inches, around 4.5 cm long including the bail.

White Snow Bangle

I used a tutorial from Jewelry Lessons to create this sterling silver bangle. While it took me a lot of time to do it, I found it quite easy and fun. Due to the very repetitive nature of the project, I found myself soon in a calm and relaxed mood. Before I knew it (a few hours later), the bangle was done. I think I will do another one, wider this time and with thicker wire. This was done with 18ga as base and 26 gauge as wrapping. Not sure I like the clasp, the jury is still out on that part... I'm thinking if I do one much thicker, I might not need a clasp at all...


Happy New Year everyone!

Black and white bracelet

While looking over my jewelry I realized that I don't have many pieces with classic colors, like black and white, so I made this quick, easy and fun bracelet. Goldstone beads - not exactly black, but very dark blue, and milk opal white beads. The fun elephant clasp is there to break a bit the classic style of the design.

Healing Pendant

I mentioned in my previous post about the Yellow Amphora that I worked on two similar pendants both in the shape of an amphora. Here is the second one. The picture is not high quality, unfortunately just as I didn't have time these days to be busy with jewelry, I also didn't have time to learn photography and editing (one of the things I will include in my New Year's resolution), but the pendant is really great.

I used a quartz crystal in the middle - also called a healing point, or a crystal point. I love these crystal points as they promote healing and channel the positive energy to the wearer. I have actually a large crystal on my work desk in my office.

The Yellow Amphora

I'm back after a few months of absense from wire wrapping. Sadly this is how is going to be for the next year or so. First of December I've celebrated one year since I stopped working for a boss, and started a venture on my own. Here is a blog where I'm keeping track of what I am up to since I fired my boss if you care to read :)
Until I have my earnings on auto-pilot, I need to focus most of my time on building up my business, so I don't really have much time just yet for making jewelry. But as time passes and my income increases, I will be devoting again more and more time to wrapping wire.

I've spent this weekend creating two pendant, both similar in structure however a bit different in execution. In this post I present the first one. It takes its inspiration from the Greek amphora.

The materials used are yellow jade and sterling silver. As usual the pictures are not so great...

Roxanne earrings

These earrings are huge! And the name Roxanne is simply because it was all the time humming in my head while crafting this unique pair of silver earrings. I know for some people the name needs to have a deep meaning, even spiritual in nature, but for me, this was it. And I think it fits nicely. A cheerful Roxanne, dancing in the disco with her huge flashy earrings...

Large Swarovski gorgeous red crystals surrounding a herringbone weave dangling from the center of the sterling silver frame.

New photos taken of the Eyes of Horus

I've decided to play some more with my new Canon digital camera and took a couple of new shots of the Eyes of Horus earrings that I made a few weeks ago. I also changed the earwires as the previous ones didn't seem too stable for me. These are just perfect, however.

To see more information, click on my Dawanda listing.


Two new pair of silver earrings this week

I was quite busy this week with my business, however I managed to squeeze in two quick pairs of sterling silver earrings. The green stone is jade and the red is agate done in herringbone weave with a clear quartz briolette hanging from a sterling silver chain at the bottom. I guess silver chain was the motif this week for both pairs :) I had a few shorter chain ends which I wanted to use somehow. And this is one tip for people who have lots of lose ends of wire or chain or even 1-2 beads. You can very easily incorporate them in your new jewelry pieces like I did with the chain links for both earrings.

The Eyes Of Horus - Herringbone Weave Silver Earrings

Rather crappy shots but I like this pair of earrings. Reminds me strongly of the eyes of Horus. Mixed in a couple of techniques, of course my favorite herringbone weave and used one of Eni's chandelier tutorials for attaching the smoke quartz briolettes. Sterling silver corrugated beads surround the goldstone eyes in the middle.
I might have to retake the pictures in a better lighting.

Drops Of Sunshine - Yellow jade agate sterling silver necklace

I've been working on this necklace the whole week, a bit every evening after work. Today I finished the chain, clasp, tumbled it for about 2 hours for extra spark and durability and took pictures of it.

The stone is a gorgeous yellow jade briolette that matches beautifully the small yellow agate beads. Wrapped in several gauges of sterling silver wire, the chain is approximately 45 cm.
It wears perfectly with a summer dress on a tanned decollete.
To purchase, visit this link at my Dawanda shop.

New life of old earrings


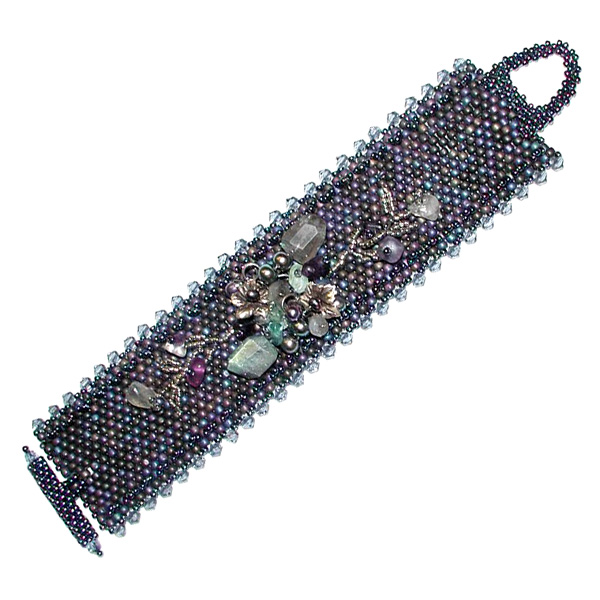
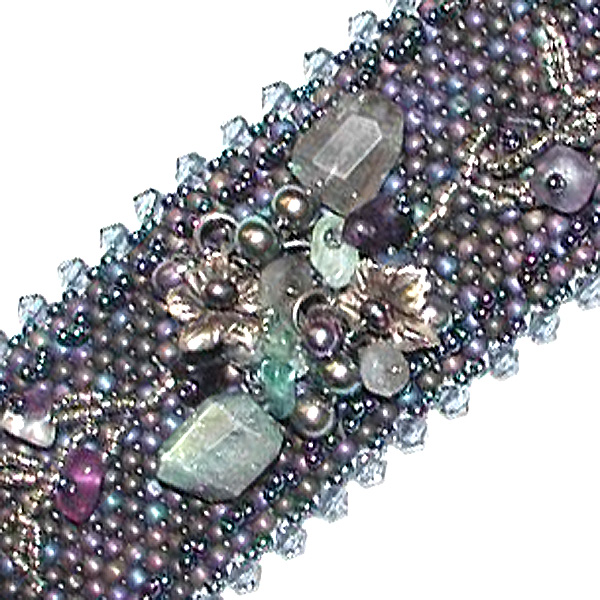
Recently a friend of my friend has brought me a pair of old vintage earrings (Sterling silver, labradorite and pearls) and asked me to create an unusual piece of jewelry using those earrings.


Create a new pair of earrings using the old ones? Oh, no! I decided to keep the old design, and put the earrings together on a blank beadwoven bracelet. I picked up seed beads matching labradorite and pearls for the bracelet, and added a few seed bead branches with amethyst rounds, pearls and some gemstone chips. So, here we are!

AddThis Social Bookmark Button

Simplicity

Let's face it, we are in the middle of recession, no matter how much we want to ignore it. And although it has started in the US, it can be felt all around the world, including in Europe.

Why do I mention this? Because we all know when the money is tight(er), the two things that go first are perfume and jewelry. Many women stop buying jewelry until the situation is better. I mean jewelry and perfumes are still considered luxury items. And they are the first to go.
And if you have been following wire wrapping lately, it has become very complex, complicated and expensive. And no doubt about it, gorgeous as well.

This is why for the next few months I will be focusing on creating very affordable, yet sweet, elegant and beautiful jewelry. Focus will be on those of us who - no matter what situation the economy is in - we do not want to deny ourselves those little secret pleasures, like eating a few dark chocolate pralines, or wearing a cute pair of earrings.

Having this in mind, I am starting the very affordable collection of simplicity and beauty.

The first in this collection is actually an interchangeable pair of earrings - i.e. you buy two pairs for the price of one! Changing the beads on the earwires is extremely easy, just slide them off and put the new on in place. Voila, you have a new pair of earrings for that other outfit.

The stones are orange agate beads and chunky amethyst briolettes on sterling silver fancy earwires.
Everything has been tumbled in my Lortone tumbler for added shine and durability.
Shipping as usual is free. Price is shown both in EUR and USD, use whichever is more appropriate for you, depending on your geo location.


17 Euros


22 USD

Marcasite used in jewelry

Marcasite sterling silver pendantI've been talking with somebody about marcasite jewelry, and I had to admit that I didn't know what that is. It seems I've never heard of marcasite before. So I looked it up on Google (I have to say, Google search is one of my best friends, it doesn't hide anything from me and it gives me everything I want!) and here are some interesting tidbits on marcasite.

So what is marcasite?
Marcasite, as a mineral is called irons sulfide, however most of the called marcasite used in jewelry is actually iron pyrite, as real marcasite often crumbles into dust and is thus too delicate and soft to be used in jewelry.
Marcasite was especially fashionable in Victorian times (one of my favourite period times). Jewelers usually describe marcasite as a bronze color, and you can usually see marcasite jewelry shining with a vintage estate look.
In jewellery, marcasite combines very well with sterling silver and other white metals, however it's not used with gold, as marcasite and gold do not blend well together.

It seems that when used in jewelry, it tends to be mostly cut in triangle or oval shape. One of the other stones that combines well with marcasite is the black onyx. Also mother of pearl, pearl and opal are stones that go well with marcasite.

As to what type of jewelry one can make with marcasite? Well, you can make the most common types, like earrings, necklaces, bracelets, pendants, rings and even broches. The example in the picture is a gorgeous oval shaped pendant used as a locket, with a man-made amethyst in the middle.

Marcasite is one type of mineral that is glued mostly with jeweler's cement (I have hypocement at home, that should work well), rather than being prong set. Because of this, water should not really touch the jewelry as the stones will fall out quite fast from their setting. So make sure that you never go swimming, or take a bath or go sauna with your marcasite pendant. Or wash dishes (yes, some of us still wash the dishes by hand) with your marcasite ring on.

Now although I've mentioned sonic cleaner for cleaning sterling silver jewelry, for marcasite this is a no-no. To remove the tarnish, all you need to do with your marcasite jewelry is wipe it gently with a soft cloth, which can be dry or slightly damp. The silver polishing pads that I give for free with my jewelry (sadly no marcasite jewelry in sight yet) should do the job.

Which brings me to one other tip for cleaning your jewelry that I forgot to mention in my previous post. Wear your silver jewelry regularly. Yep, that will keep the tarnish away from your silver jewelry for a much longer time than if it's simply put in a safe place.

As a final note, for those interested in the healing properties of marcasite, here they are:
Marcasite is believed to fend of negative energies, improve one’s communications abilities, and protect those working in dangerous occupations.

Making sterling silver headpins without a torch

The other day I was making headpins and I ran out of gas for my little torch. Since I'm making headpins on the kitchen counter, next to the counter is the cooking appliance. I thought to myself, let's try it, why not. And it worked beautifully! Below are a few steps with pictures on how to do it with your regular cooking appliance.
Note: this is only applicable if you want to make headpins. It DOES not work if you want to solder :) But for a quick fix, if you ran out of gas and you're in the middle of the gorgeous pair of earrings and don't have any headpins left, it works :)


1. Cut your wire to size and put them in the flux (mine is some yellow borax liquid from the local jewelry supply shop). I prefer the flux to touch the whole pin, not only the part to be in the fire


2. Take the wire and hold it similarly to how I hold it in the picture, relatively vertical if possible, so the wire blobs up nicely in the middle. You see the bottom becomes after 1-2 seconds strongly yellow. Right after this it curls up into a nice round blob.


3. Take it away from the fire and inspect it briefly. If the blob is not in the middle, or is too small, or not to your liking, put it brieflyback in the fire and repeat the procedure. IF all is good, go to step 4.


4. In the meantime have hot (but not boiling) water in a jar of some sort, but make sure that the dish is not metal. I use a bowl that I bought yoghurt in a while ago. Then put a teaspoon full of pickle. The brand I use is in this picture.


5. As you finish with each pin, put it in the jar with the pickle. You see as the pins are in the container, they are all dark, ugly, oxidized. If you hadn't used flux before, it would be much much worse! Make sure that if you are using anything metal
to put the pins in the container, the metal does not touch the pickle. On the other hand, do not throw the pins in the pickle carelessly either, as the pickel is acid, and although it's not a strong one (yeah I tested it with my finger once, just coz...), it's still acid and not very healthy for your skin (or god forbid your eyes).

6. Leave the pins in the container for anything btw. 5-10 minutes (at least in my experience), until the headpins are nice and white. They are all coated with the film that will be removed during polishing stage.


7. Take out the pins from the pot using anything but metal. I have a copper thong just for this particular task.
My way of polishing the pins is with a Lortone tumbler. Use stainless steel shot of different forms, add a few drops of dishwashing liquid. The US folks recommend Dawn, but as the rest of the world might not be equiped with Dawn, you can use any regular liquid. I'm using in general Palmolive, as this is the one I have in my household. Before that I used a no-name liquid that you buy in the supermarket in larger quantities, as it's cheaper. It worked just the same.
Leave the pins for about an hour or so in the tumbler, and when ready, take them out, rinse well and enjoy using your new home-made pins :)